> ## Documentation Index
> Fetch the complete documentation index at: https://docs.masivo.ai/llms.txt
> Use this file to discover all available pages before exploring further.
# Links
> Learn how to create and manage links in Masivo marketing automation
Links are the backbone of marketing automation measurement in Masivo. They enable you to track and analyze every marketing flow, whether you're using standalone links or embedding them within push notifications, emails, or journey workflows.
## What you'll learn
By the end of this guide, you'll know how to create trackable short links that drive traffic and measure engagement.
For better brand recognition, consider setting up your custom domain before
creating links. You can configure this in
[Links settings](/guides/settings/links).
## Step 1: Access the links section
Navigate to **Marketing Automation > Links** in the dashboard. You'll find it in the left sidebar - this is your hub for creating and managing all trackable links.
Click the **New link** button to start creating your first trackable link.
## Step 2: Configure your link basics
Start by setting up the fundamental properties that define how your link will work:
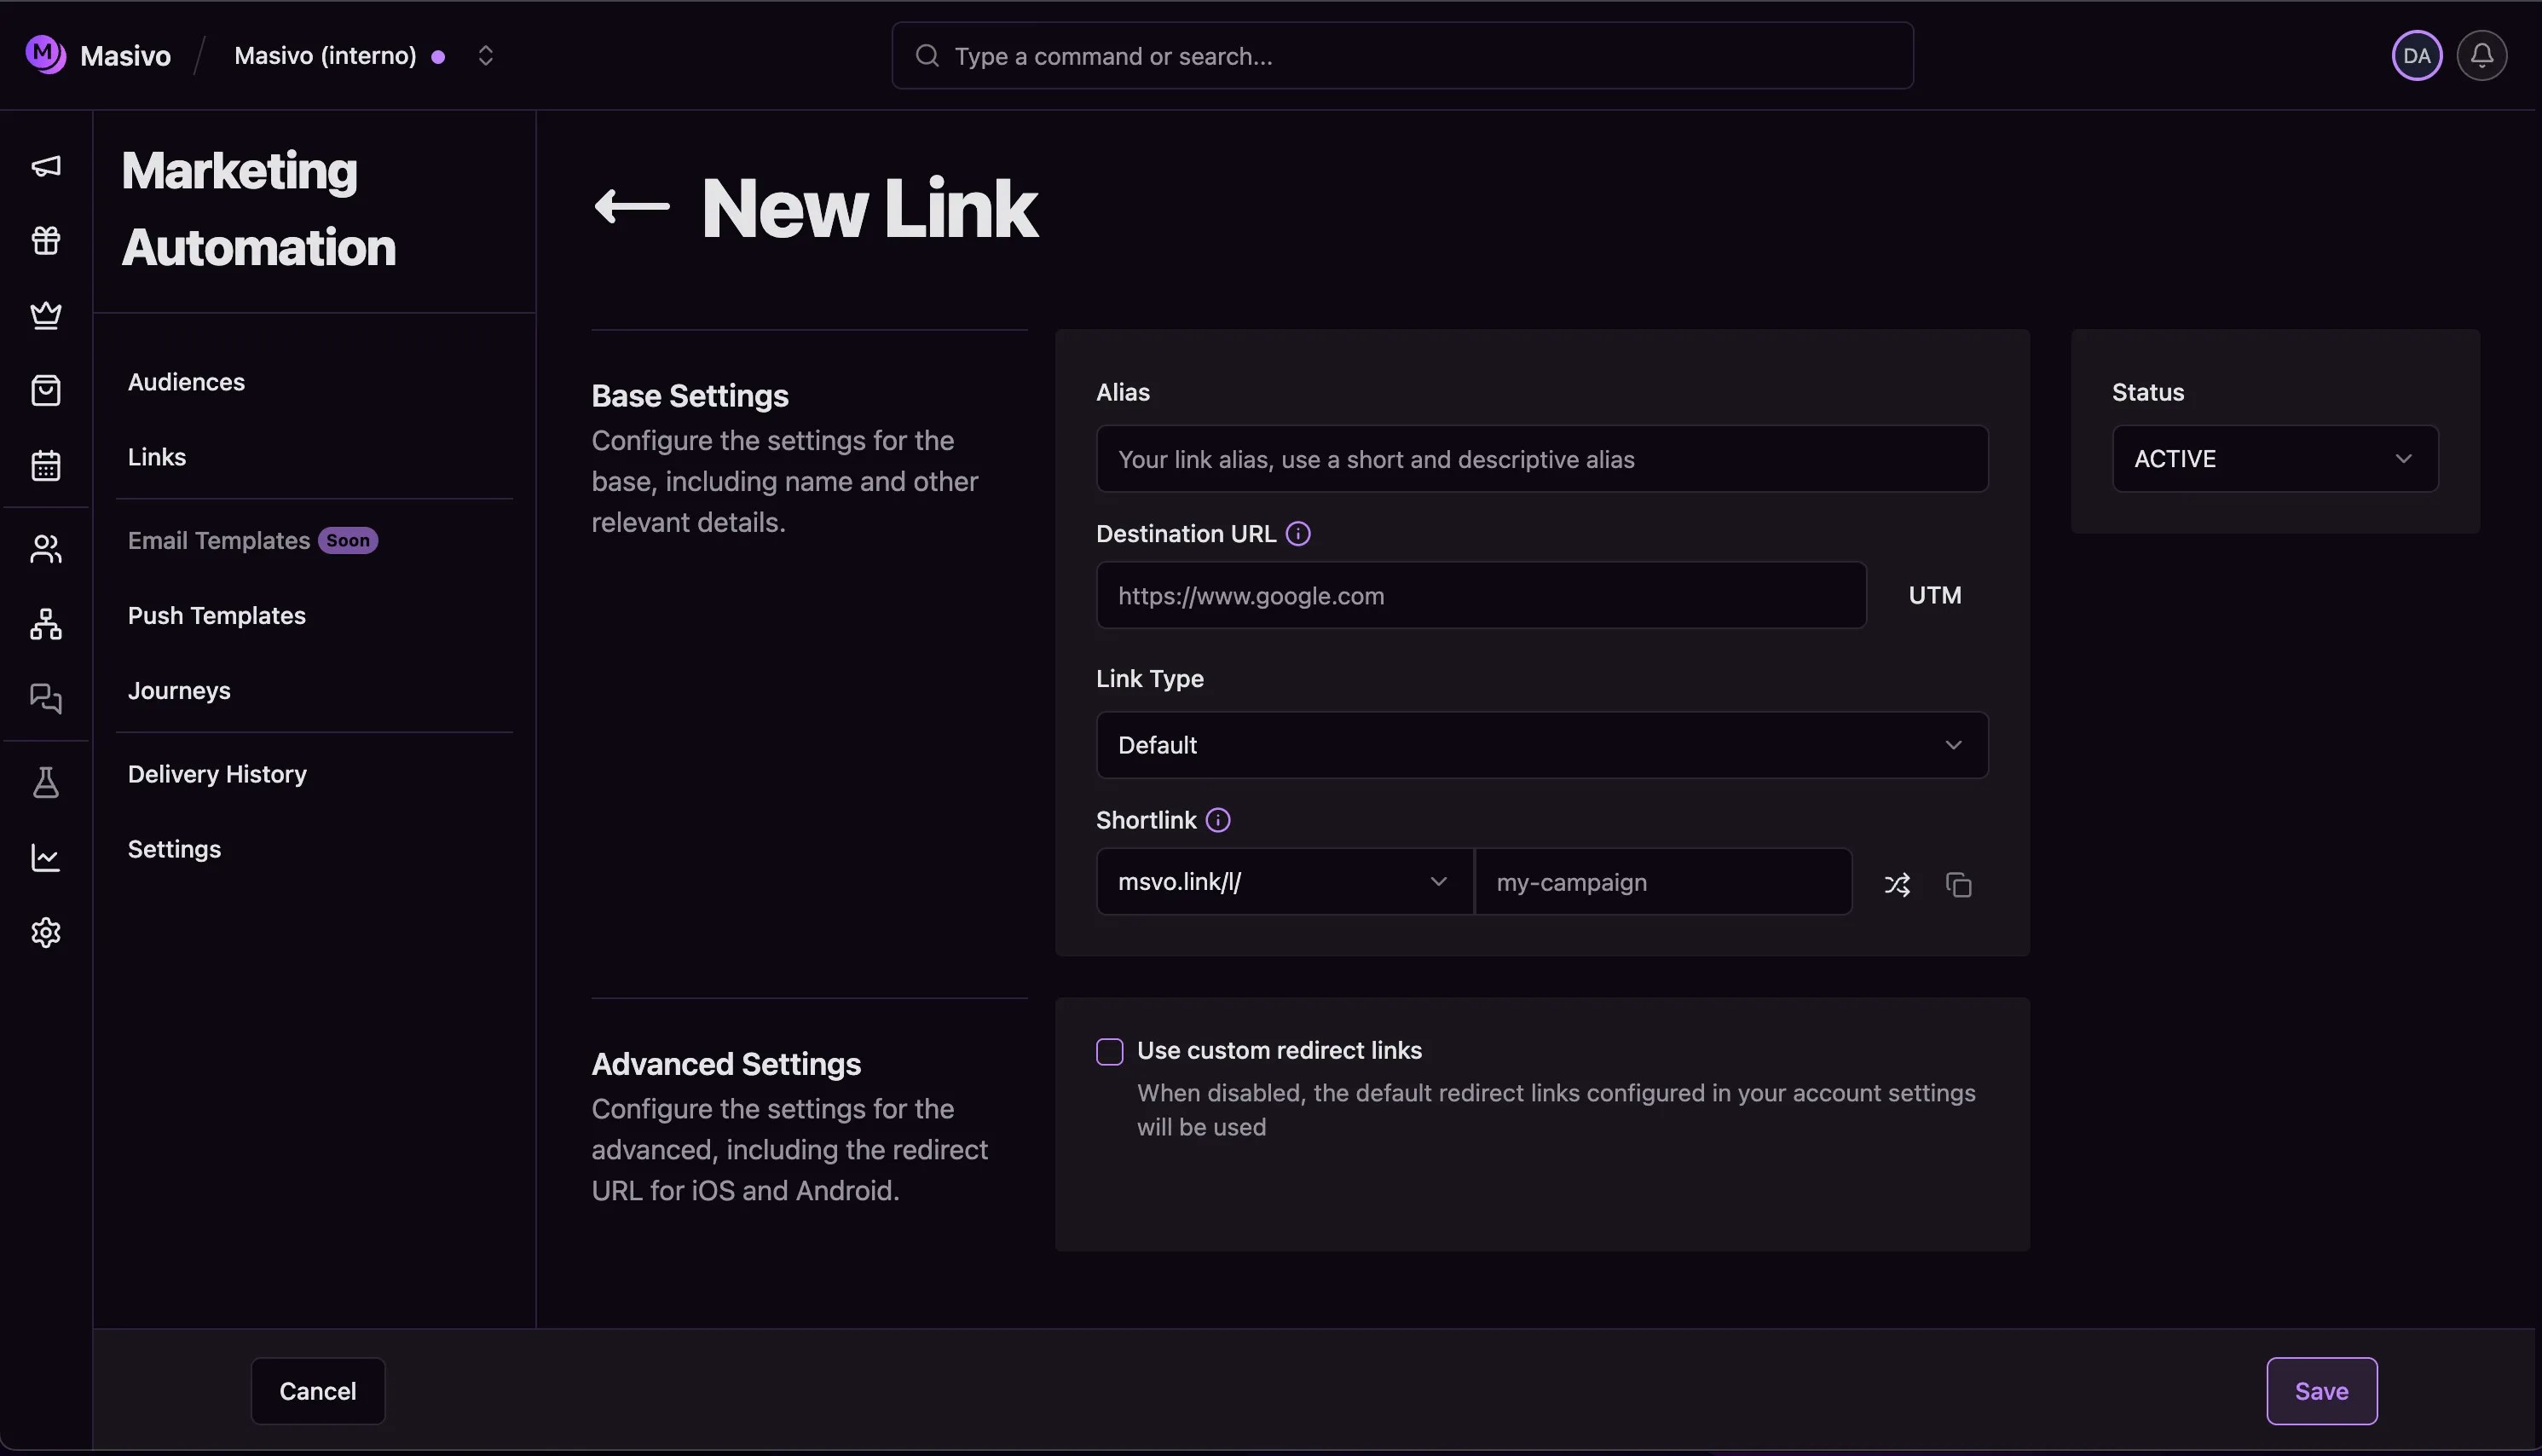 **Create a memorable alias**: Choose a short, descriptive name like "summer-sale" or "app-download." This helps you identify the link's purpose at a glance and makes it more trustworthy for users.
**Set your destination URL**: Enter the complete URL where users should land, including `https://`. This could be a product page, landing page, or any web destination that supports your campaign goals.
**Choose the right link type** based on your use case:
* **Default**: Use for general marketing campaigns, email newsletters, and social media posts
* **Ads**: Select when creating links specifically for paid advertising campaigns
* **QR**: Choose when you need a scannable QR code for print materials or physical displays
## Step 3: Customize your short link
**Select your domain**: Choose between the custom domains you've configured in your account settings.
**Create your custom path**: This becomes the end of your short URL. For example, if you enter "holiday-deals", your final link will be `msvo.link/l/holiday-deals`.
**Create a memorable alias**: Choose a short, descriptive name like "summer-sale" or "app-download." This helps you identify the link's purpose at a glance and makes it more trustworthy for users.
**Set your destination URL**: Enter the complete URL where users should land, including `https://`. This could be a product page, landing page, or any web destination that supports your campaign goals.
**Choose the right link type** based on your use case:
* **Default**: Use for general marketing campaigns, email newsletters, and social media posts
* **Ads**: Select when creating links specifically for paid advertising campaigns
* **QR**: Choose when you need a scannable QR code for print materials or physical displays
## Step 3: Customize your short link
**Select your domain**: Choose between the custom domains you've configured in your account settings.
**Create your custom path**: This becomes the end of your short URL. For example, if you enter "holiday-deals", your final link will be `msvo.link/l/holiday-deals`.
 You can generate a random path using the shuffle button if you prefer, or copy
the complete short URL using the copy button for immediate use.
## Step 4: Set up smart redirects (advanced)
For mobile app marketing, configure custom redirects to create seamless user experiences:
**Enable custom redirects**: Toggle this on when you want different behavior for iOS and Android users.
**Configure iOS redirects**: Set where iPhone users go (typically your App Store listing or a specific app screen).
**Configure Android redirects**: Define where Android users land (usually your Google Play Store page or app deep link).
### Recover the destination after an app install
Normally, a user who doesn't have your app yet just lands on the app store — the original destination (a promo, a specific screen) is lost once they install and open the app for the first time. Deferred deep linking closes that gap: when the app opens, it can ask Masivo "was this install started from a link?" and get routed to the right place automatically.
This works differently on each platform:
* **Android**: works automatically for every link, no setup needed. Masivo attaches the click to the Play Store redirect, and the app reads it back through the Play Install Referrer API on first open.
* **iOS**: requires opt-in per link, since it relies on the clipboard. In **Advanced Settings**, enable **Deferred deep linking via clipboard (iOS)**. Before sending users to the App Store, they'll see a **Get the app** button that copies the link to their clipboard. The first time the app opens, iOS shows a system prompt asking to allow pasting — accepting it lets the app recover the destination.
This feature requires your mobile app to integrate the Masivo SDK's deep
linking module. Share the [integration
guide](/api-reference/guides/integrate-deferred-deep-linking) with your
development team if you want to enable it for your app.
## Step 5: Add UTM tracking (optional)
Masivo includes a built-in UTM builder if you need it for campaign tracking.
Click the UTM settings button next to your destination URL to add campaign tracking parameters:
* **Source**: Identify where traffic comes from (e.g., "newsletter", "facebook", "google")
* **Medium**: Specify the marketing medium (e.g., "email", "social", "cpc")
* **Campaign**: Name your specific campaign (e.g., "summer-sale-2024")
* **Term**: Add keywords for paid search campaigns
* **Content**: Differentiate between ad variations or email versions
These parameters help you track which campaigns drive the most valuable traffic in your analytics tools.
## Step 6: Generate QR codes for offline marketing
You can generate a random path using the shuffle button if you prefer, or copy
the complete short URL using the copy button for immediate use.
## Step 4: Set up smart redirects (advanced)
For mobile app marketing, configure custom redirects to create seamless user experiences:
**Enable custom redirects**: Toggle this on when you want different behavior for iOS and Android users.
**Configure iOS redirects**: Set where iPhone users go (typically your App Store listing or a specific app screen).
**Configure Android redirects**: Define where Android users land (usually your Google Play Store page or app deep link).
### Recover the destination after an app install
Normally, a user who doesn't have your app yet just lands on the app store — the original destination (a promo, a specific screen) is lost once they install and open the app for the first time. Deferred deep linking closes that gap: when the app opens, it can ask Masivo "was this install started from a link?" and get routed to the right place automatically.
This works differently on each platform:
* **Android**: works automatically for every link, no setup needed. Masivo attaches the click to the Play Store redirect, and the app reads it back through the Play Install Referrer API on first open.
* **iOS**: requires opt-in per link, since it relies on the clipboard. In **Advanced Settings**, enable **Deferred deep linking via clipboard (iOS)**. Before sending users to the App Store, they'll see a **Get the app** button that copies the link to their clipboard. The first time the app opens, iOS shows a system prompt asking to allow pasting — accepting it lets the app recover the destination.
This feature requires your mobile app to integrate the Masivo SDK's deep
linking module. Share the [integration
guide](/api-reference/guides/integrate-deferred-deep-linking) with your
development team if you want to enable it for your app.
## Step 5: Add UTM tracking (optional)
Masivo includes a built-in UTM builder if you need it for campaign tracking.
Click the UTM settings button next to your destination URL to add campaign tracking parameters:
* **Source**: Identify where traffic comes from (e.g., "newsletter", "facebook", "google")
* **Medium**: Specify the marketing medium (e.g., "email", "social", "cpc")
* **Campaign**: Name your specific campaign (e.g., "summer-sale-2024")
* **Term**: Add keywords for paid search campaigns
* **Content**: Differentiate between ad variations or email versions
These parameters help you track which campaigns drive the most valuable traffic in your analytics tools.
## Step 6: Generate QR codes for offline marketing
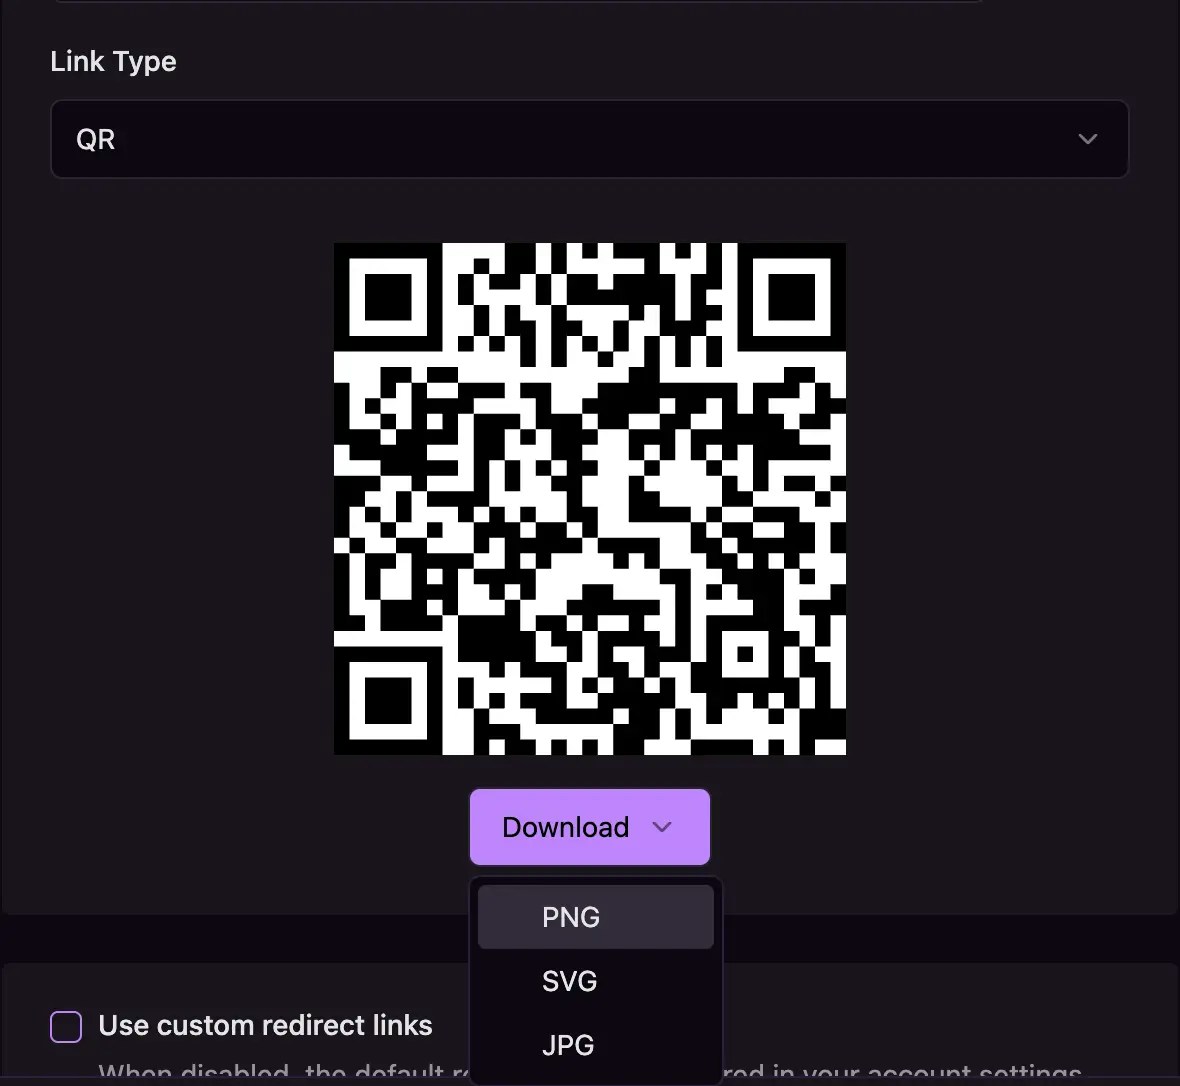 When you select **QR** as your link type, Masivo automatically creates a scannable QR code perfect for:
* Print advertisements and brochures
* Product packaging and labels
* Event displays and signage
* Business cards and flyers
The QR code updates automatically whenever you change the destination URL, keeping your offline materials current.
## What you've accomplished
You've created trackable links that provide valuable insights into your
marketing performance while delivering seamless user experiences. Your links
are now ready to drive traffic and measure engagement across all your
campaigns.
## Next steps
Once your links are active, you can track their performance and export analytics data:
* **Configure global link behavior**: Review [Links settings](/guides/settings/links) for domains, redirects, and QR branding
* **View analytics**: Navigate to **Analytics > Links** to see clicks, conversions, and traffic sources
* **Export data**: Learn how to [export analytics tables to CSV](/guides/analytics-exports) for deeper analysis and reporting
## Advanced link management
### Configure global settings
Visit **Marketing Automation > Settings > Links** to set up:
Detailed guide: [Links settings](/guides/settings/links)
**Custom domains**: Add your own branded domains instead of using `msvo.link` for better brand recognition and trust.
**Default redirects**: Set fallback iOS and Android URLs that apply to all links unless you specify custom redirects.
**QR code branding**: Upload your logo to appear in the center of all generated QR codes for consistent brand presentation.
## Related architecture
* [Marketing & destinations](/resources/data-architecture#marketing-destinations) — How trackable links support journeys, audience sends, and measurement
When you select **QR** as your link type, Masivo automatically creates a scannable QR code perfect for:
* Print advertisements and brochures
* Product packaging and labels
* Event displays and signage
* Business cards and flyers
The QR code updates automatically whenever you change the destination URL, keeping your offline materials current.
## What you've accomplished
You've created trackable links that provide valuable insights into your
marketing performance while delivering seamless user experiences. Your links
are now ready to drive traffic and measure engagement across all your
campaigns.
## Next steps
Once your links are active, you can track their performance and export analytics data:
* **Configure global link behavior**: Review [Links settings](/guides/settings/links) for domains, redirects, and QR branding
* **View analytics**: Navigate to **Analytics > Links** to see clicks, conversions, and traffic sources
* **Export data**: Learn how to [export analytics tables to CSV](/guides/analytics-exports) for deeper analysis and reporting
## Advanced link management
### Configure global settings
Visit **Marketing Automation > Settings > Links** to set up:
Detailed guide: [Links settings](/guides/settings/links)
**Custom domains**: Add your own branded domains instead of using `msvo.link` for better brand recognition and trust.
**Default redirects**: Set fallback iOS and Android URLs that apply to all links unless you specify custom redirects.
**QR code branding**: Upload your logo to appear in the center of all generated QR codes for consistent brand presentation.
## Related architecture
* [Marketing & destinations](/resources/data-architecture#marketing-destinations) — How trackable links support journeys, audience sends, and measurement