> ## Documentation Index
> Fetch the complete documentation index at: https://docs.masivo.ai/llms.txt
> Use this file to discover all available pages before exploring further.
# Purchase Attribution System
> Complete guide to implementing and understanding Masivo's purchase attribution system - track marketing campaign effectiveness, loyalty program impact, and measure ROI across all customer touchpoints
## Overview
Masivo's Purchase Attribution System automatically tracks and attributes customer purchases to their originating marketing touchpoints, whether from marketing automation campaigns (links, emails, push notifications) or loyalty program engagement. This system enables you to measure campaign effectiveness, calculate ROI, and understand which channels drive conversions.
Attribution is calculated automatically based on tracking IDs, loyalty
transactions, and configured attribution windows. This guide covers setup,
configuration, and implementation best practices.
## How Attribution Works
The attribution system operates in three stages:
1. **Event Collection**: Purchases and touchpoints (link clicks, reward accumulations) are tracked with attribution data
2. **Attribution Calculation**: System matches purchases to their originating touchpoints within configured time windows
3. **Performance Analysis**: Attribution data powers analytics and ROI calculations
### Attribution Flow Diagram
```
Marketing Touchpoint Purchase Event Attribution Record
------------------ --------------- -------------------
Link Open → Customer → Campaign Performance
├─ tracking_id ├─ Same tracking_id ├─ Revenue attributed
├─ UTM parameters ├─ Purchase data ├─ Time to conversion
└─ Timestamp └─ Timestamp └─ Campaign details
OR
Loyalty Accumulation → Purchase Event → Loyalty Attribution
├─ Reward earned ├─ event_id ├─ Revenue attributed
├─ event_id ├─ Redemption ├─ Time to conversion
└─ Timestamp └─ Timestamp └─ Loyalty impact
```
## Attribution Types
Masivo supports two primary attribution types:
### 1. Marketing Attribution
Tracks purchases that originated from marketing campaigns including:
* **Links/Deeplinks**: Short URLs with tracking parameters
* **Email Campaigns**: Email templates sent via marketing automation
* **Push Notifications**: Push campaigns with tracking
**Key Identifier**: `tracking_id` - Links the customer's journey from click to purchase
### 2. Loyalty Attribution
Tracks purchases influenced by loyalty program engagement:
* **Reward Accumulation**: Customer earned rewards before purchase
* **Reward Redemption**: Customer redeemed rewards during purchase
**Key Identifier**: `event_id` - Links reward transactions to purchase events
## Setting Up Attribution
### Step 1: Configure Attribution Windows
Attribution windows define how long after a touchpoint a purchase can be attributed to that campaign.
Navigate to **Settings → Attribution Windows** in your Masivo dashboard.
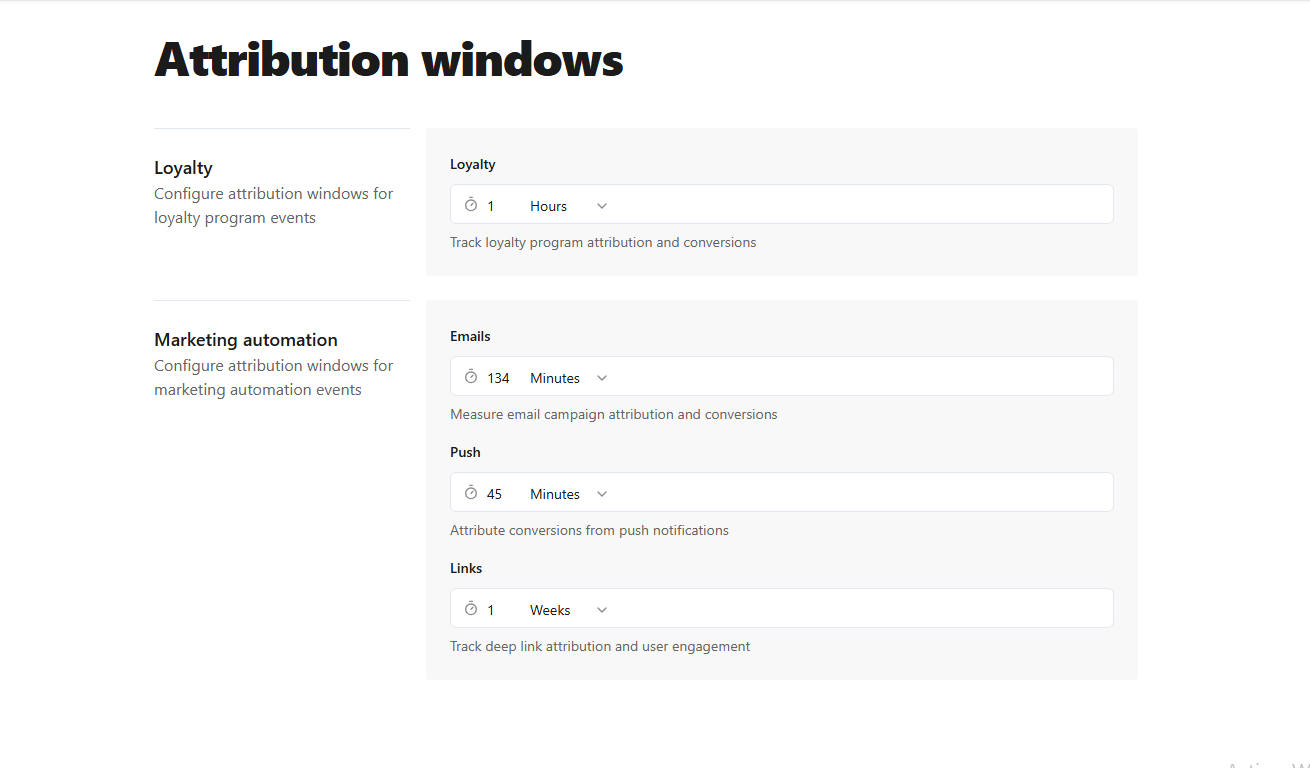 Configure windows for each attribution type:
```json theme={null}
{
"marketing_automation_links": 10080, // 7 days in minutes
"marketing_automation_emails": 2880, // 2 days in minutes
"marketing_automation_push": 1440, // 1 day in minutes
"loyalty": 43200 // 30 days in minutes
}
```
Setting windows too short may undercount attribution. Setting them too long
may overattribute to older campaigns.
### Step 2: Configure Ad Providers
Ad providers define traffic sources and their attribution share for multi-touch attribution.
Navigate to **Settings → Ad Providers** in your Masivo dashboard.
Configure windows for each attribution type:
```json theme={null}
{
"marketing_automation_links": 10080, // 7 days in minutes
"marketing_automation_emails": 2880, // 2 days in minutes
"marketing_automation_push": 1440, // 1 day in minutes
"loyalty": 43200 // 30 days in minutes
}
```
Setting windows too short may undercount attribution. Setting them too long
may overattribute to older campaigns.
### Step 2: Configure Ad Providers
Ad providers define traffic sources and their attribution share for multi-touch attribution.
Navigate to **Settings → Ad Providers** in your Masivo dashboard.
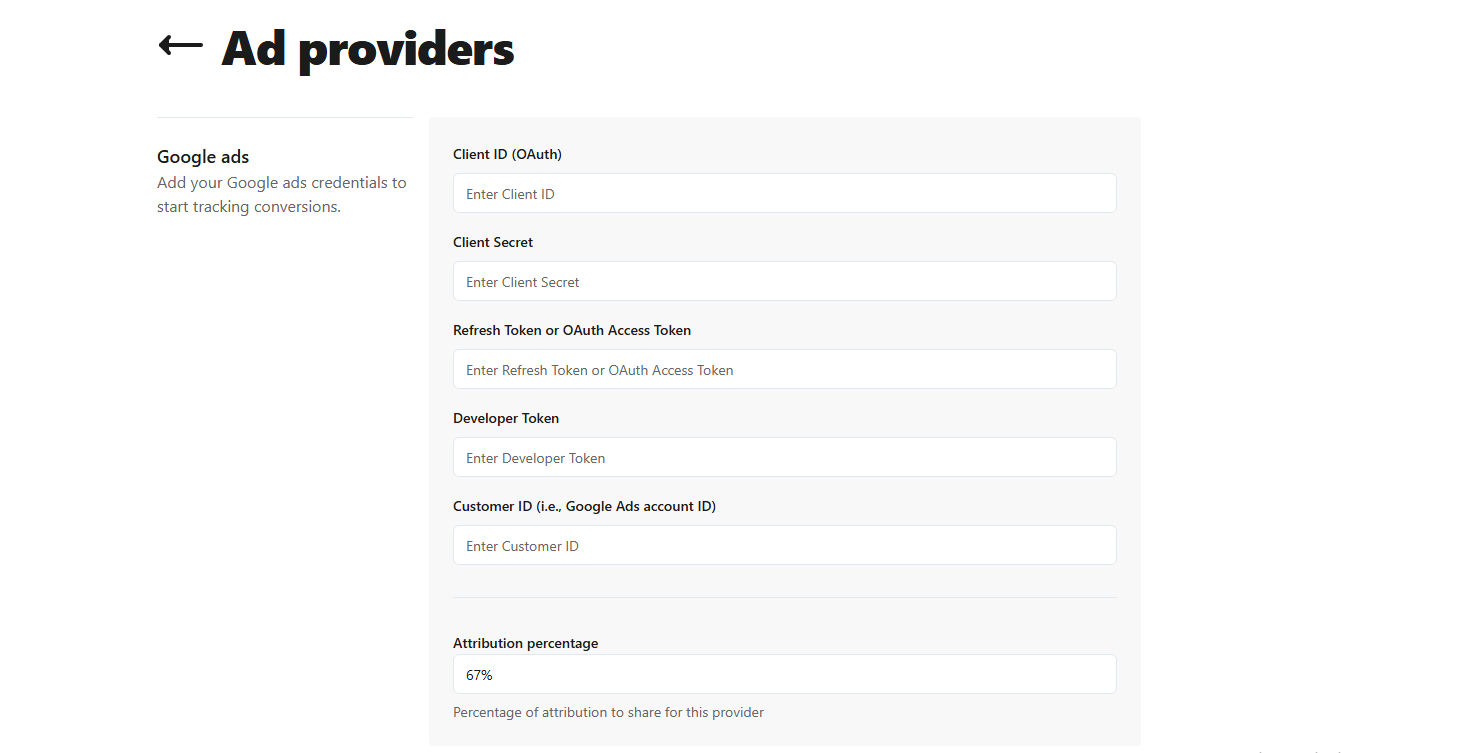 Configure providers with attribution percentages:
| Provider | Type | Attribution % | Use Case |
| ---------- | -------- | ------------- | ------------------------------- |
| Google Ads | `google` | 100% | Single-touch attribution |
| Meta Ads | `meta` | 50% | Multi-touch with other channels |
| Email | `email` | 100% | Direct email campaigns |
**Attribution Percentage Explained:**
* `100%`: Full revenue credit to this channel
* `<100%`: Partial credit (for multi-touch attribution)
* Used to calculate channel-specific ROI
### Step 3: Implement Attribution in Events
The most critical step is including attribution data when sending events to Masivo.
#### Essential: The `ad_provider` Parameter
The `ad_provider` is **crucial** for attribution tracking. It identifies the traffic source and must match a configured ad provider in your settings.
**Where `ad_provider` Comes From:**
1. **From Masivo Short Links** (Recommended):
Set `ad_provider` in the destination URL when creating the link:
```
https://yourapp.com/products?ad_provider=meta&utm_source=facebook&utm_campaign=summer-sale
```
When customers click the Masivo short link, they're redirected to this URL with the `ad_provider` parameter intact. Your app extracts it from the URL.
2. **Direct in Events** (Only if not from a link):
If the purchase didn't originate from a Masivo link, include it in the event:
```typescript theme={null}
const attribution = {
tracking_id: "generated-tracking-id",
ad_provider: "meta" // Only when not coming from link redirect
};
```
Always use Masivo short links for marketing campaigns - this ensures proper
ad\_provider tracking. Only include ad\_provider directly in events for non-link
traffic.
#### Complete Event Implementation
```typescript theme={null}
// When customer clicks marketing link and lands in your app
const tracking_id = extractTrackingId(window.location.href);
const ad_provider = new URLSearchParams(window.location.search).get(
"ad_provider"
);
// Store for later use
sessionStorage.setItem("masivo_tracking_id", tracking_id);
sessionStorage.setItem("masivo_ad_provider", ad_provider);
// When customer makes a purchase
const sendPurchaseEvent = async (purchaseData: {
customer_id: string;
brand_id: string;
order_id: string;
total: number;
products: any[];
}) => {
const tracking_id = sessionStorage.getItem("masivo_tracking_id");
const ad_provider = sessionStorage.getItem("masivo_ad_provider");
const eventPayload = {
type: "PURCHASE",
customer_id: purchaseData.customer_id,
brand_id: purchaseData.brand_id,
// Attribution object - critical for attribution tracking
attribution: {
tracking_id, // Links to marketing touchpoint
ad_provider, // REQUIRED - identifies traffic source
utm_source: "facebook", // Optional but recommended
utm_medium: "social", // Optional but recommended
utm_campaign: "summer-sale", // Optional but recommended
revenue: purchaseData.total, // Enables ROI calculations
cost: 5.5 // Optional: campaign cost per conversion
},
order: {
purchase_id: purchaseData.order_id,
value: purchaseData.total,
products: purchaseData.products.map(p => ({
sku: p.sku,
amount: p.quantity,
value: p.price
})),
payment_method: "CREDIT"
}
};
const response = await fetch(
"https://app.masivo.ai/api/storefront/v1/behavior/events",
{
method: "POST",
headers: {
Authorization: `Bearer ${accessToken}`,
"Content-Type": "application/json"
},
body: JSON.stringify(eventPayload)
}
);
return response.json();
};
```
## Attribution Object Structure
### Complete Attribution Schema
```typescript theme={null}
interface AttributionData {
// Core Tracking
tracking_id?: string; // UUID linking touchpoint to purchase
// Provider Identification (CRITICAL)
ad_provider?: string; // Must match configured provider name
// UTM Parameters (Recommended)
utm_source?: string; // Traffic source: "google", "facebook", "email"
utm_medium?: string; // Medium: "cpc", "social", "email", "push"
utm_campaign?: string; // Campaign name
utm_term?: string; // Paid search keywords
utm_content?: string; // Ad variation identifier
utm_referral?: string; // Specific referral source
// Financial Tracking
revenue?: number; // Purchase value for ROI calculation
cost?: number; // Acquisition cost for this conversion
}
```
### Fallback Behavior
Masivo's attribution system uses intelligent fallbacks:
```
Priority 1: Link/Email/Push attribution data
Priority 2: Purchase event attribution data
Priority 3: Default values (ad_provider: "unknown")
```
This means if a customer clicks a link without full attribution but the purchase event includes it, attribution will still work correctly.
## Attribution Calculation Logic
### Marketing Attribution Flow
1. **Customer clicks marketing link**
* `LINK_OPEN` event created with `tracking_id`
* Timestamp recorded: `2025-01-15 12:00:00`
2. **Customer makes purchase**
* `PURCHASE` event includes same `tracking_id`
* Timestamp recorded: `2025-01-17 14:30:00`
3. **Attribution calculation**
```
Time to conversion = 2 days, 2.5 hours = 3,150 minutes
Attribution window = 10,080 minutes (7 days)
Within window? 3,150 ≤ 10,080 → YES ✓
Campaign type: "marketing_automation_links"
Revenue: $99.99
Attribution: 100%
```
4. **Attribution record created**
* Links purchase to campaign
* Records conversion metrics
* Powers analytics dashboards
### Loyalty Attribution Flow
1. **Customer earns rewards**
* `PURCHASE` event creates accumulation transaction
* `event_id` links transaction to event
* Timestamp: `2025-01-10 10:00:00`
2. **Customer makes new purchase with redemption**
* `PURCHASE` event with same customer
* Customer redeems previously earned rewards
* Timestamp: `2025-02-05 15:00:00`
3. **Attribution calculation**
```
Earliest accumulation: 2025-01-10 10:00:00
Purchase time: 2025-02-05 15:00:00
Time since accumulation = 26 days, 5 hours = 37,500 minutes
Loyalty attribution window = 43,200 minutes (30 days)
Within window? 37,500 ≤ 43,200 → YES ✓
Campaign type: "loyalty"
Revenue: $149.99
Attribution: 100%
```
4. **Loyalty attribution record created**
* Tracks loyalty program impact
* Measures program ROI
* Identifies high-value loyalty customers
### Time-to-Conversion Metrics
Attribution automatically calculates and stores:
* **Marketing Campaigns**: Minutes from link click to purchase
* **Loyalty**: Minutes from first reward accumulation to purchase
* **Conversion Rate**: Percentage of clicks that convert
* **Revenue per Click**: Average revenue per campaign click
## Testing Attribution
### 1. Test Link Attribution
```bash theme={null}
# Create a test link with attribution
curl -X POST https://app.masivo.ai/api/storefront/v1/links \
-H "Authorization: Bearer YOUR_TOKEN" \
-H "Content-Type: application/json" \
-d '{
"destination_url": "https://yourapp.com/products?ad_provider=meta",
"attribution": {
"ad_provider": "meta",
"utm_source": "facebook",
"utm_campaign": "test-campaign"
}
}'
# Click the generated short link
# Extract tracking_id from redirected URL
# Make a test purchase with that tracking_id
```
### 2. Test Loyalty Attribution
```typescript theme={null}
// 1. Create purchase that earns rewards
await sendPurchaseEvent({
type: "PURCHASE",
customer_id: "test-customer",
order: {
purchase_id: "order-1",
value: 100
}
});
// 2. Wait for reward accumulation
// 3. Create second purchase with redemption
await sendPurchaseEvent({
type: "PURCHASE",
customer_id: "test-customer",
order: {
purchase_id: "order-2",
value: 150
}
// System automatically links via event_id
});
// Check attribution records to verify loyalty attribution
```
## Best Practices
### 1. Always Include `ad_provider`
```typescript theme={null}
// ✅ GOOD - Clear provider identification
{
ad_provider: "meta",
tracking_id: "...",
utm_source: "facebook"
}
// ❌ BAD - Missing provider defaults to "unknown"
{
tracking_id: "...",
utm_source: "facebook"
}
```
### 2. Use Consistent Naming Conventions
```typescript theme={null}
// Provider names must match exactly
// Dashboard: "meta"
// Code: "meta" ✓
// Dashboard: "Google Ads"
// Code: "google_ads" ✗ → Won't match!
```
## Troubleshooting
### No Attribution Records Created
**Problem**: Purchases not being attributed to campaigns
**Solutions**:
1. Verify `tracking_id` is included in purchase events
2. Check attribution windows aren't too restrictive
3. Confirm `ad_provider` matches configured providers
4. Ensure timestamp of purchase is after touchpoint
### Incorrect Attribution Percentage
**Problem**: Revenue is over/under-attributed
**Solutions**:
1. Review ad provider configuration percentages
2. Check for duplicate provider names
3. Verify provider names match exactly (case-sensitive)
### Missing Loyalty Attribution
**Problem**: Loyalty-driven purchases not attributed
**Solutions**:
1. Verify `event_id` exists on purchase events
2. Check loyalty attribution window is adequate (30-60 days recommended)
3. Ensure customer has reward transactions before purchase
4. Confirm reward accumulations have valid timestamps
### Time to Conversion is NULL
**Problem**: Attribution records missing conversion time
**Solutions**:
1. Check that link/accumulation timestamp is valid (not 1970-01-01)
2. Verify timestamp is before purchase time
3. Ensure `line_issued_at` or `transaction_issued_at` fields are populated
## Next steps
Once your attribution system is configured and tracking data, you can analyze performance:
* **View analytics**: Navigate to **Analytics** to see attribution reports, campaign ROI, and conversion metrics across all channels
* **Export data**: Learn how to [export analytics tables to CSV](/guides/analytics-exports) for deeper analysis of attribution patterns, multi-touch conversion paths, and campaign performance
## Related Resources
* [Attribution Tracking API Guide](/api-reference/guides/attribution-tracking) - Developer implementation details
* [Journey Triggers](/api-reference/guides/journey-triggers) - Automated campaign triggers
* [Create Links](/guides/create-links) - Marketing link creation
* [Track Customer Activity](/guides/track-customer-activity) - Event tracking basics
* [Marketing Automations](/guides/marketing-automations) - Campaign setup
## Related architecture
* [Activity & events](/resources/data-architecture#activity-events) — How purchases and touchpoints enter the attribution pipeline
* [Marketing & destinations](/resources/data-architecture#marketing-destinations) — How marketing links, journeys, and messages connect to conversions
Configure providers with attribution percentages:
| Provider | Type | Attribution % | Use Case |
| ---------- | -------- | ------------- | ------------------------------- |
| Google Ads | `google` | 100% | Single-touch attribution |
| Meta Ads | `meta` | 50% | Multi-touch with other channels |
| Email | `email` | 100% | Direct email campaigns |
**Attribution Percentage Explained:**
* `100%`: Full revenue credit to this channel
* `<100%`: Partial credit (for multi-touch attribution)
* Used to calculate channel-specific ROI
### Step 3: Implement Attribution in Events
The most critical step is including attribution data when sending events to Masivo.
#### Essential: The `ad_provider` Parameter
The `ad_provider` is **crucial** for attribution tracking. It identifies the traffic source and must match a configured ad provider in your settings.
**Where `ad_provider` Comes From:**
1. **From Masivo Short Links** (Recommended):
Set `ad_provider` in the destination URL when creating the link:
```
https://yourapp.com/products?ad_provider=meta&utm_source=facebook&utm_campaign=summer-sale
```
When customers click the Masivo short link, they're redirected to this URL with the `ad_provider` parameter intact. Your app extracts it from the URL.
2. **Direct in Events** (Only if not from a link):
If the purchase didn't originate from a Masivo link, include it in the event:
```typescript theme={null}
const attribution = {
tracking_id: "generated-tracking-id",
ad_provider: "meta" // Only when not coming from link redirect
};
```
Always use Masivo short links for marketing campaigns - this ensures proper
ad\_provider tracking. Only include ad\_provider directly in events for non-link
traffic.
#### Complete Event Implementation
```typescript theme={null}
// When customer clicks marketing link and lands in your app
const tracking_id = extractTrackingId(window.location.href);
const ad_provider = new URLSearchParams(window.location.search).get(
"ad_provider"
);
// Store for later use
sessionStorage.setItem("masivo_tracking_id", tracking_id);
sessionStorage.setItem("masivo_ad_provider", ad_provider);
// When customer makes a purchase
const sendPurchaseEvent = async (purchaseData: {
customer_id: string;
brand_id: string;
order_id: string;
total: number;
products: any[];
}) => {
const tracking_id = sessionStorage.getItem("masivo_tracking_id");
const ad_provider = sessionStorage.getItem("masivo_ad_provider");
const eventPayload = {
type: "PURCHASE",
customer_id: purchaseData.customer_id,
brand_id: purchaseData.brand_id,
// Attribution object - critical for attribution tracking
attribution: {
tracking_id, // Links to marketing touchpoint
ad_provider, // REQUIRED - identifies traffic source
utm_source: "facebook", // Optional but recommended
utm_medium: "social", // Optional but recommended
utm_campaign: "summer-sale", // Optional but recommended
revenue: purchaseData.total, // Enables ROI calculations
cost: 5.5 // Optional: campaign cost per conversion
},
order: {
purchase_id: purchaseData.order_id,
value: purchaseData.total,
products: purchaseData.products.map(p => ({
sku: p.sku,
amount: p.quantity,
value: p.price
})),
payment_method: "CREDIT"
}
};
const response = await fetch(
"https://app.masivo.ai/api/storefront/v1/behavior/events",
{
method: "POST",
headers: {
Authorization: `Bearer ${accessToken}`,
"Content-Type": "application/json"
},
body: JSON.stringify(eventPayload)
}
);
return response.json();
};
```
## Attribution Object Structure
### Complete Attribution Schema
```typescript theme={null}
interface AttributionData {
// Core Tracking
tracking_id?: string; // UUID linking touchpoint to purchase
// Provider Identification (CRITICAL)
ad_provider?: string; // Must match configured provider name
// UTM Parameters (Recommended)
utm_source?: string; // Traffic source: "google", "facebook", "email"
utm_medium?: string; // Medium: "cpc", "social", "email", "push"
utm_campaign?: string; // Campaign name
utm_term?: string; // Paid search keywords
utm_content?: string; // Ad variation identifier
utm_referral?: string; // Specific referral source
// Financial Tracking
revenue?: number; // Purchase value for ROI calculation
cost?: number; // Acquisition cost for this conversion
}
```
### Fallback Behavior
Masivo's attribution system uses intelligent fallbacks:
```
Priority 1: Link/Email/Push attribution data
Priority 2: Purchase event attribution data
Priority 3: Default values (ad_provider: "unknown")
```
This means if a customer clicks a link without full attribution but the purchase event includes it, attribution will still work correctly.
## Attribution Calculation Logic
### Marketing Attribution Flow
1. **Customer clicks marketing link**
* `LINK_OPEN` event created with `tracking_id`
* Timestamp recorded: `2025-01-15 12:00:00`
2. **Customer makes purchase**
* `PURCHASE` event includes same `tracking_id`
* Timestamp recorded: `2025-01-17 14:30:00`
3. **Attribution calculation**
```
Time to conversion = 2 days, 2.5 hours = 3,150 minutes
Attribution window = 10,080 minutes (7 days)
Within window? 3,150 ≤ 10,080 → YES ✓
Campaign type: "marketing_automation_links"
Revenue: $99.99
Attribution: 100%
```
4. **Attribution record created**
* Links purchase to campaign
* Records conversion metrics
* Powers analytics dashboards
### Loyalty Attribution Flow
1. **Customer earns rewards**
* `PURCHASE` event creates accumulation transaction
* `event_id` links transaction to event
* Timestamp: `2025-01-10 10:00:00`
2. **Customer makes new purchase with redemption**
* `PURCHASE` event with same customer
* Customer redeems previously earned rewards
* Timestamp: `2025-02-05 15:00:00`
3. **Attribution calculation**
```
Earliest accumulation: 2025-01-10 10:00:00
Purchase time: 2025-02-05 15:00:00
Time since accumulation = 26 days, 5 hours = 37,500 minutes
Loyalty attribution window = 43,200 minutes (30 days)
Within window? 37,500 ≤ 43,200 → YES ✓
Campaign type: "loyalty"
Revenue: $149.99
Attribution: 100%
```
4. **Loyalty attribution record created**
* Tracks loyalty program impact
* Measures program ROI
* Identifies high-value loyalty customers
### Time-to-Conversion Metrics
Attribution automatically calculates and stores:
* **Marketing Campaigns**: Minutes from link click to purchase
* **Loyalty**: Minutes from first reward accumulation to purchase
* **Conversion Rate**: Percentage of clicks that convert
* **Revenue per Click**: Average revenue per campaign click
## Testing Attribution
### 1. Test Link Attribution
```bash theme={null}
# Create a test link with attribution
curl -X POST https://app.masivo.ai/api/storefront/v1/links \
-H "Authorization: Bearer YOUR_TOKEN" \
-H "Content-Type: application/json" \
-d '{
"destination_url": "https://yourapp.com/products?ad_provider=meta",
"attribution": {
"ad_provider": "meta",
"utm_source": "facebook",
"utm_campaign": "test-campaign"
}
}'
# Click the generated short link
# Extract tracking_id from redirected URL
# Make a test purchase with that tracking_id
```
### 2. Test Loyalty Attribution
```typescript theme={null}
// 1. Create purchase that earns rewards
await sendPurchaseEvent({
type: "PURCHASE",
customer_id: "test-customer",
order: {
purchase_id: "order-1",
value: 100
}
});
// 2. Wait for reward accumulation
// 3. Create second purchase with redemption
await sendPurchaseEvent({
type: "PURCHASE",
customer_id: "test-customer",
order: {
purchase_id: "order-2",
value: 150
}
// System automatically links via event_id
});
// Check attribution records to verify loyalty attribution
```
## Best Practices
### 1. Always Include `ad_provider`
```typescript theme={null}
// ✅ GOOD - Clear provider identification
{
ad_provider: "meta",
tracking_id: "...",
utm_source: "facebook"
}
// ❌ BAD - Missing provider defaults to "unknown"
{
tracking_id: "...",
utm_source: "facebook"
}
```
### 2. Use Consistent Naming Conventions
```typescript theme={null}
// Provider names must match exactly
// Dashboard: "meta"
// Code: "meta" ✓
// Dashboard: "Google Ads"
// Code: "google_ads" ✗ → Won't match!
```
## Troubleshooting
### No Attribution Records Created
**Problem**: Purchases not being attributed to campaigns
**Solutions**:
1. Verify `tracking_id` is included in purchase events
2. Check attribution windows aren't too restrictive
3. Confirm `ad_provider` matches configured providers
4. Ensure timestamp of purchase is after touchpoint
### Incorrect Attribution Percentage
**Problem**: Revenue is over/under-attributed
**Solutions**:
1. Review ad provider configuration percentages
2. Check for duplicate provider names
3. Verify provider names match exactly (case-sensitive)
### Missing Loyalty Attribution
**Problem**: Loyalty-driven purchases not attributed
**Solutions**:
1. Verify `event_id` exists on purchase events
2. Check loyalty attribution window is adequate (30-60 days recommended)
3. Ensure customer has reward transactions before purchase
4. Confirm reward accumulations have valid timestamps
### Time to Conversion is NULL
**Problem**: Attribution records missing conversion time
**Solutions**:
1. Check that link/accumulation timestamp is valid (not 1970-01-01)
2. Verify timestamp is before purchase time
3. Ensure `line_issued_at` or `transaction_issued_at` fields are populated
## Next steps
Once your attribution system is configured and tracking data, you can analyze performance:
* **View analytics**: Navigate to **Analytics** to see attribution reports, campaign ROI, and conversion metrics across all channels
* **Export data**: Learn how to [export analytics tables to CSV](/guides/analytics-exports) for deeper analysis of attribution patterns, multi-touch conversion paths, and campaign performance
## Related Resources
* [Attribution Tracking API Guide](/api-reference/guides/attribution-tracking) - Developer implementation details
* [Journey Triggers](/api-reference/guides/journey-triggers) - Automated campaign triggers
* [Create Links](/guides/create-links) - Marketing link creation
* [Track Customer Activity](/guides/track-customer-activity) - Event tracking basics
* [Marketing Automations](/guides/marketing-automations) - Campaign setup
## Related architecture
* [Activity & events](/resources/data-architecture#activity-events) — How purchases and touchpoints enter the attribution pipeline
* [Marketing & destinations](/resources/data-architecture#marketing-destinations) — How marketing links, journeys, and messages connect to conversions