> ## Documentation Index
> Fetch the complete documentation index at: https://docs.masivo.ai/llms.txt
> Use this file to discover all available pages before exploring further.
# WhatsApp settings
> Configure WhatsApp credentials, webhook URL, and business logo for template delivery
## What you'll learn
By the end of this guide, you'll know how to configure WhatsApp settings in
Masivo so templates can be approved, tested, and delivered correctly.
## Step 1: Open WhatsApp settings
Navigate to **Marketing Automation > Settings > WhatsApp**.
## Step 2: Configure credentials
In **WhatsApp Credentials**, complete:
* **Access Token**
* **Phone Numbers** (one or more entries with `Label` and `Phone Number ID`)
* **Business Account ID**
* **App ID**
* **Verify Token**
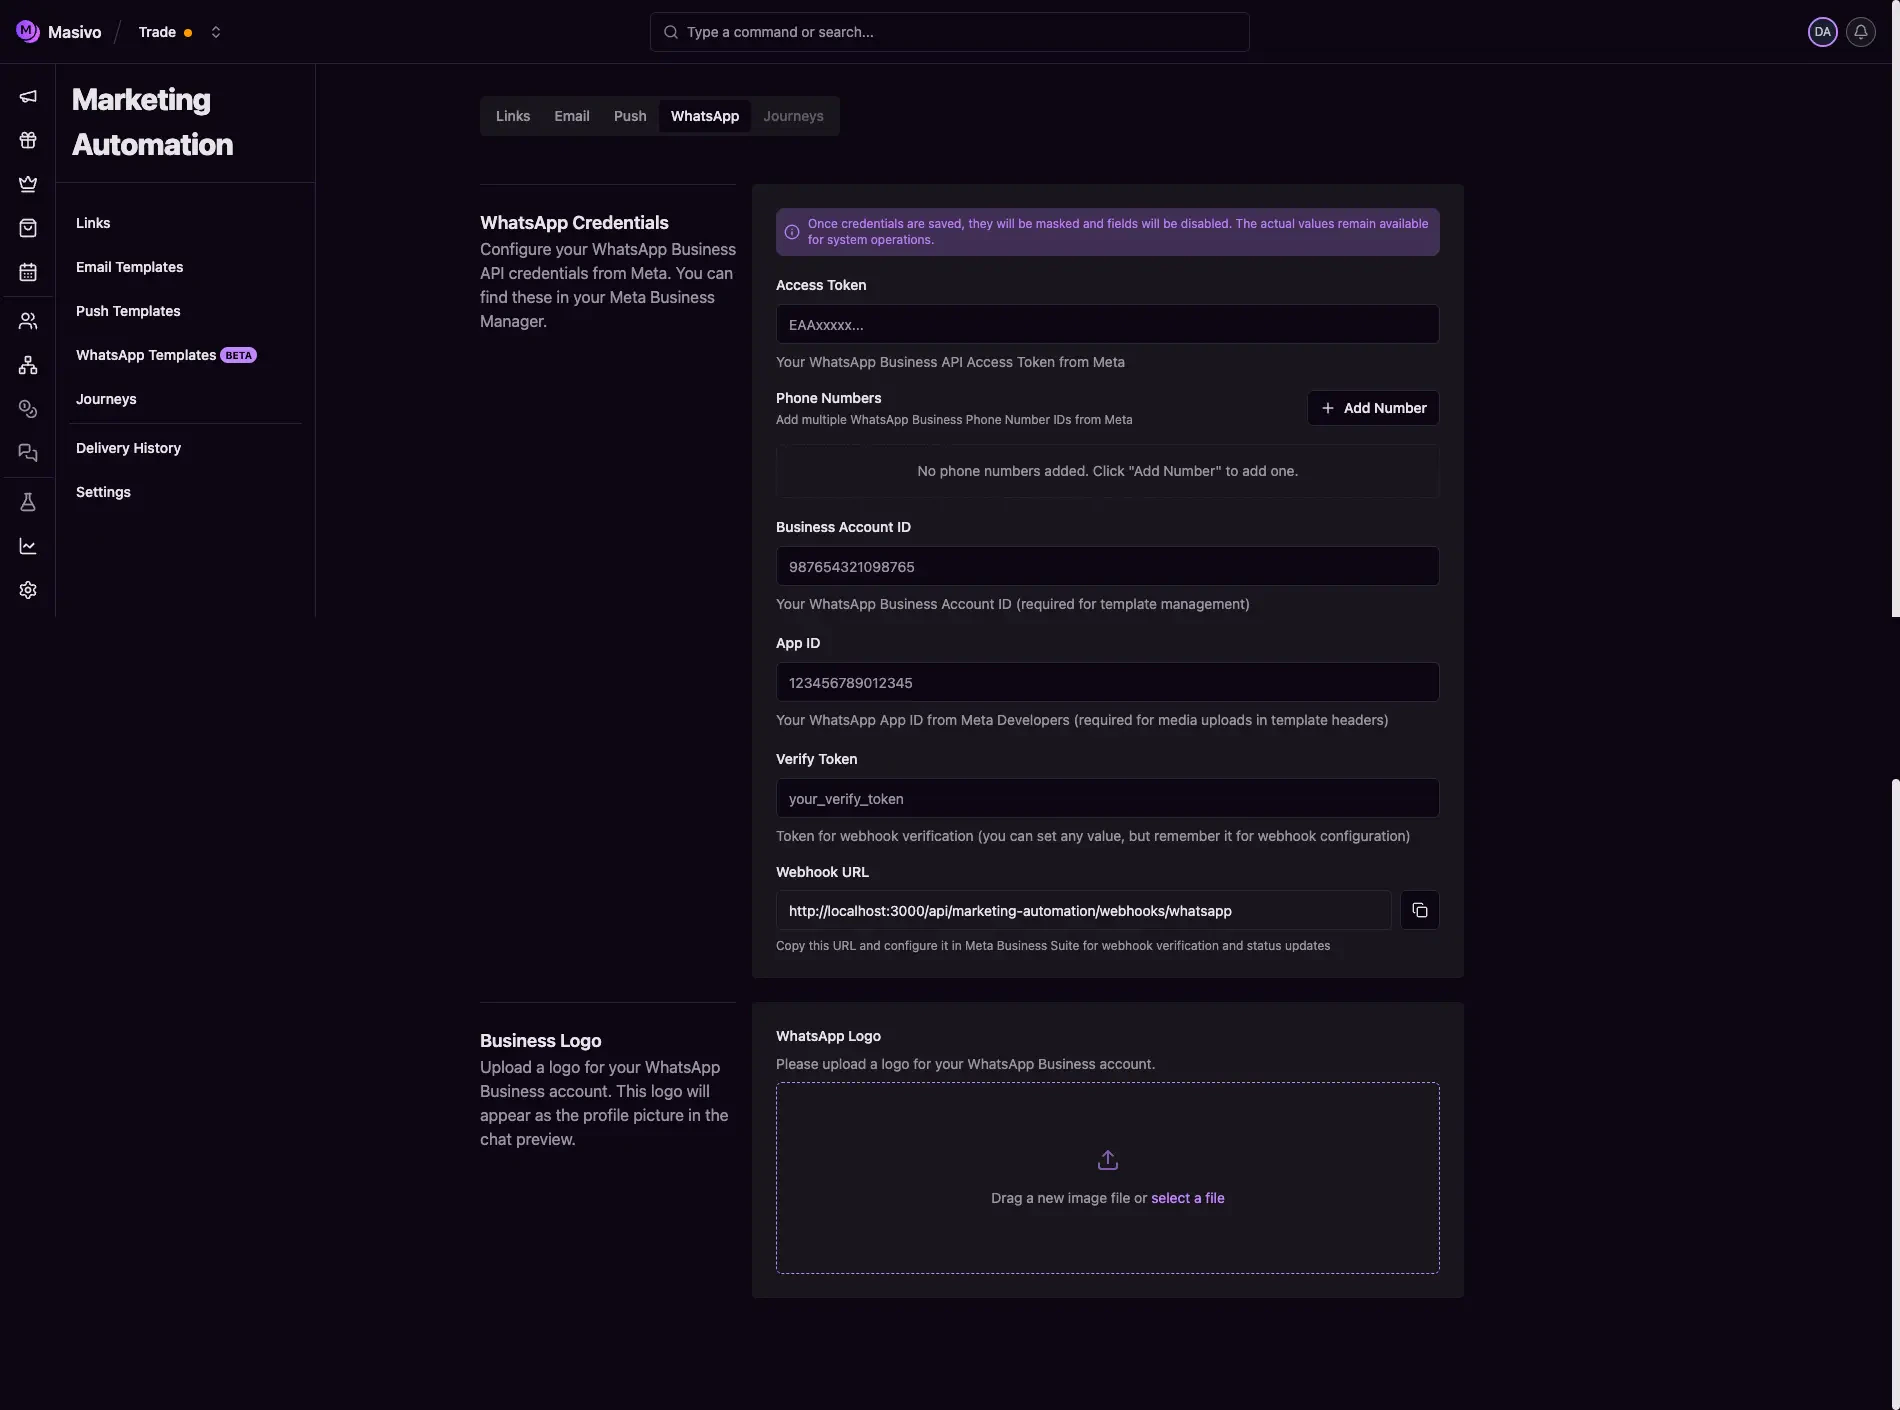 Field behavior:
* Phone Number IDs, Business Account ID, and App ID use numeric identifiers.
* You can add/remove phone number entries from the form.
* The webhook URL is displayed read-only with a copy button.
### How to get the Access Token
Use a **system user** token from Meta Business Manager (long-lived; suitable for
production). Official steps are in Meta’s
[WhatsApp access tokens](https://developers.facebook.com/docs/whatsapp/access-tokens)
guide.
Summary:
1. Open **[Business settings](https://business.facebook.com/settings/)**
(`business.facebook.com`), then go to **Users** and **System users**.
2. Click **Add** and create a system user (choose **Admin** or **Employee**).
Admin users get full access to WABAs in your business portfolio by default;
**Employee** users need each **WhatsApp Business Account (WABA)** assigned
with **Full control** (or partial access if you prefer a tighter scope).
3. Open the system user, use **Assign assets**, and add your **Meta Developer
app** with **Manage app** so the user ends with **Full control** of that app
(reload the page if the asset does not show immediately).
4. Assign your **WhatsApp Business Account** to the same system user with
**Full control** when required (especially for **Employee** system users).
5. In the system user panel, click **Generate token**. Select your app, set
token expiration if prompted, and include at least **`whatsapp_business_messaging`**,
**`whatsapp_business_management`**, and **`business_management`**. Generate
the token and copy it once—store it securely; you may not see it again.
### How to get the Business Account ID
**Business Account ID** is your **WhatsApp Business Account ID (WABA ID)**—the
numeric id of the WABA tied to your numbers and templates.
In Meta Business Manager:
1. Open **[Business settings](https://business.facebook.com/settings/)**
(`business.facebook.com`).
2. In the sidebar, open **Accounts** and select **WhatsApp accounts** (sometimes
labeled **WhatsApp Business accounts** or grouped under WhatsApp-related
account settings, depending on locale and UI).
3. Click the WABA you use with your app. Meta shows the **WhatsApp Business
Account ID** in the account details panel—copy that value into Masivo.
If you manage several WABAs, pick the one connected to the phone lines and Meta
app you are configuring.
### How to get the App ID
**App ID** is the numeric identifier of your **Meta app** (the one that includes
the **WhatsApp** product and that you install for the system user in Business
Manager). Use the same app across Masivo, token generation, and asset
assignment so IDs and permissions stay aligned.
Per Meta’s [App Dashboard](https://developers.facebook.com/docs/development/create-an-app/app-dashboard)
documentation:
1. Open **[My Apps](https://developers.facebook.com/apps)** and select your
app.
2. After the app loads, the **toolbar at the top of the dashboard** shows the
**App ID** (it is created with the app and cannot be changed). You can also
find it under **App settings** (or **Settings**) → **Basic**, in the app’s
summary fields.
On **My Apps**, Meta lists the **business connected to the app** when one is
linked. That business portfolio should match the **Business Manager** you use
for WABAs and system users; if the app is not connected yet, complete Meta’s
business connection / verification steps from the dashboard (for example under
**Submit for review** or **Verification**, depending on your app type) so the
app belongs to the correct portfolio.
### How to get Phone Number IDs
Each row under **Phone Numbers** needs the **Phone Number ID** (Graph API id for
that line), not the E.164 phone string. Meta documents this in
[Manage phone numbers](https://developers.facebook.com/docs/whatsapp/business-management-api/manage-phone-numbers/)
(**Get all phone numbers**).
Call the Graph API with your **WhatsApp Business Account ID** (same value as
**Business Account ID** in this form) and a token that has WhatsApp management
access:
```http theme={null}
GET https://graph.facebook.com/v24.0//phone_numbers?access_token=
```
Example (replace IDs and token with yours):
`https://graph.facebook.com/v24.0/109929475293471/phone_numbers?access_token=...`
Use the **Graph API version** your app is pinned to if it differs from `v24.0`.
The JSON response includes a `data` array. For each number, copy **`id`** into
Masivo as **Phone Number ID** and use **`display_phone_number`** or
**`verified_name`** to pick the right line when labeling. Optional fields such
as `quality_rating` help you tell numbers apart.
### Configure the webhook in Meta
Meta delivers WhatsApp events to the **callback URL** you register and checks
your **Verify Token** during setup. Use the **same** callback URL and verify
token as in Masivo (**Verify Token** in this form and the read-only webhook
URL). See Meta’s
[Set up webhooks](https://developers.facebook.com/docs/whatsapp/cloud-api/guides/set-up-webhooks/)
guide for field subscriptions and behavior.
In **[Meta App Dashboard](https://developers.facebook.com/apps)**, open your app
(the one with WhatsApp). If the app was created with the **Connect with
customers through WhatsApp** use case, go to:
1. **Use cases**
2. **Connect with customers through WhatsApp**
3. **Customize**
4. **Configuration**
There, set the **Callback URL** to Masivo’s webhook URL, enter the **Verify
token** to match Masivo exactly, and subscribe to the **webhook fields** you
need (for example **messages** and template or account fields for delivery and
status updates).
If your dashboard uses the classic layout instead, Meta documents the same panel
as **WhatsApp** → **Configuration** in the App Dashboard.
## Step 3: Configure business logo
In **Business Logo**, upload the WhatsApp profile image used in chat previews.
This file is stored in marketing automation settings storage for your account.
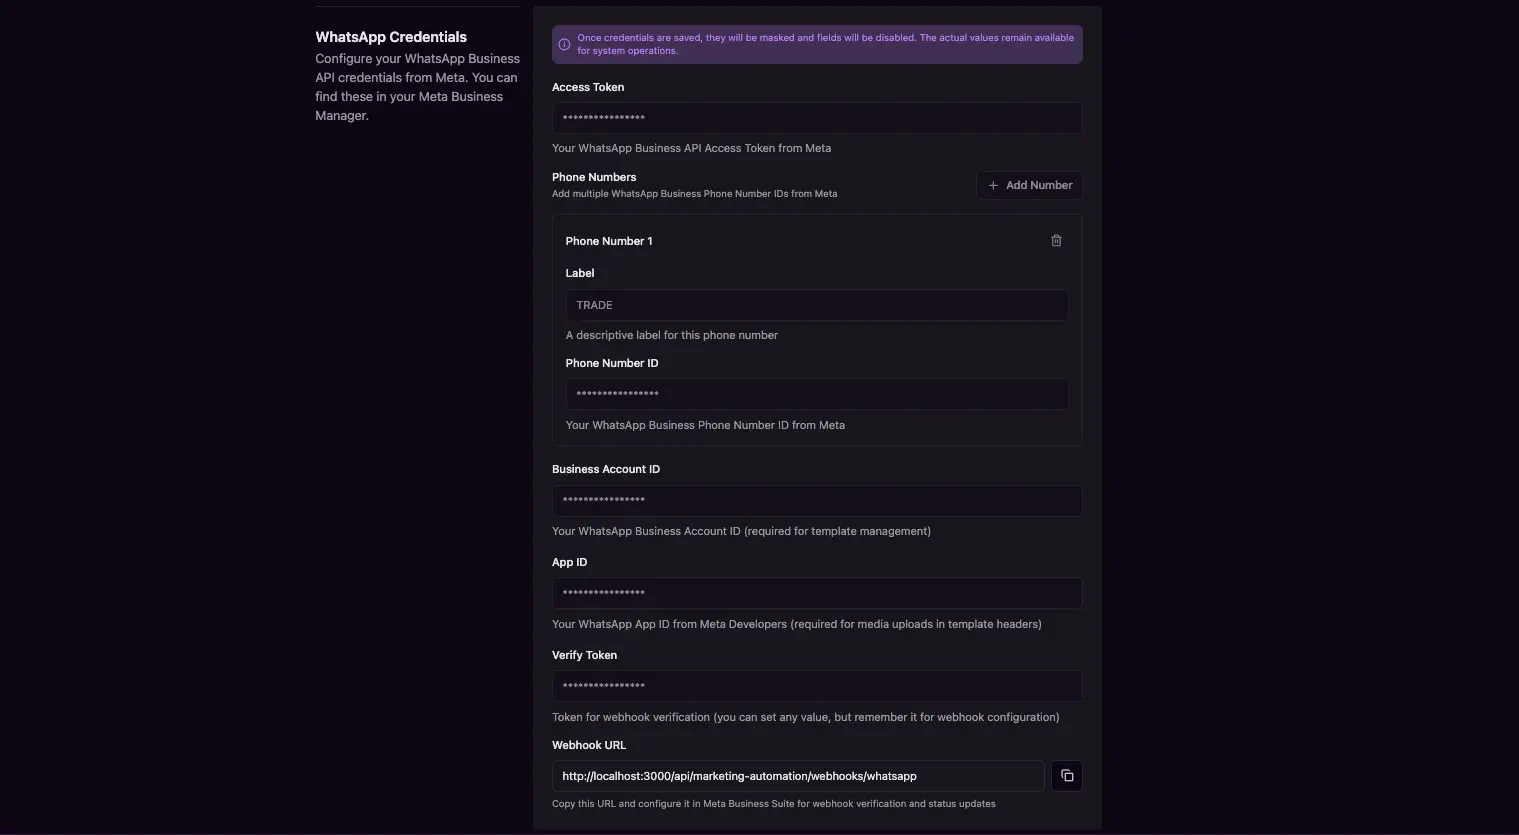
## Step 4: Save and understand masking behavior
Click **Save** in form actions.
After saving:
* Sensitive credentials are masked in the UI.
* Masked fields become disabled/read-only.
* Save actions are blocked while masked values are present.
Configure and verify all required fields before saving to avoid incomplete
credential state.
Editing is restricted for non-admin roles in this settings form.
Field behavior:
* Phone Number IDs, Business Account ID, and App ID use numeric identifiers.
* You can add/remove phone number entries from the form.
* The webhook URL is displayed read-only with a copy button.
### How to get the Access Token
Use a **system user** token from Meta Business Manager (long-lived; suitable for
production). Official steps are in Meta’s
[WhatsApp access tokens](https://developers.facebook.com/docs/whatsapp/access-tokens)
guide.
Summary:
1. Open **[Business settings](https://business.facebook.com/settings/)**
(`business.facebook.com`), then go to **Users** and **System users**.
2. Click **Add** and create a system user (choose **Admin** or **Employee**).
Admin users get full access to WABAs in your business portfolio by default;
**Employee** users need each **WhatsApp Business Account (WABA)** assigned
with **Full control** (or partial access if you prefer a tighter scope).
3. Open the system user, use **Assign assets**, and add your **Meta Developer
app** with **Manage app** so the user ends with **Full control** of that app
(reload the page if the asset does not show immediately).
4. Assign your **WhatsApp Business Account** to the same system user with
**Full control** when required (especially for **Employee** system users).
5. In the system user panel, click **Generate token**. Select your app, set
token expiration if prompted, and include at least **`whatsapp_business_messaging`**,
**`whatsapp_business_management`**, and **`business_management`**. Generate
the token and copy it once—store it securely; you may not see it again.
### How to get the Business Account ID
**Business Account ID** is your **WhatsApp Business Account ID (WABA ID)**—the
numeric id of the WABA tied to your numbers and templates.
In Meta Business Manager:
1. Open **[Business settings](https://business.facebook.com/settings/)**
(`business.facebook.com`).
2. In the sidebar, open **Accounts** and select **WhatsApp accounts** (sometimes
labeled **WhatsApp Business accounts** or grouped under WhatsApp-related
account settings, depending on locale and UI).
3. Click the WABA you use with your app. Meta shows the **WhatsApp Business
Account ID** in the account details panel—copy that value into Masivo.
If you manage several WABAs, pick the one connected to the phone lines and Meta
app you are configuring.
### How to get the App ID
**App ID** is the numeric identifier of your **Meta app** (the one that includes
the **WhatsApp** product and that you install for the system user in Business
Manager). Use the same app across Masivo, token generation, and asset
assignment so IDs and permissions stay aligned.
Per Meta’s [App Dashboard](https://developers.facebook.com/docs/development/create-an-app/app-dashboard)
documentation:
1. Open **[My Apps](https://developers.facebook.com/apps)** and select your
app.
2. After the app loads, the **toolbar at the top of the dashboard** shows the
**App ID** (it is created with the app and cannot be changed). You can also
find it under **App settings** (or **Settings**) → **Basic**, in the app’s
summary fields.
On **My Apps**, Meta lists the **business connected to the app** when one is
linked. That business portfolio should match the **Business Manager** you use
for WABAs and system users; if the app is not connected yet, complete Meta’s
business connection / verification steps from the dashboard (for example under
**Submit for review** or **Verification**, depending on your app type) so the
app belongs to the correct portfolio.
### How to get Phone Number IDs
Each row under **Phone Numbers** needs the **Phone Number ID** (Graph API id for
that line), not the E.164 phone string. Meta documents this in
[Manage phone numbers](https://developers.facebook.com/docs/whatsapp/business-management-api/manage-phone-numbers/)
(**Get all phone numbers**).
Call the Graph API with your **WhatsApp Business Account ID** (same value as
**Business Account ID** in this form) and a token that has WhatsApp management
access:
```http theme={null}
GET https://graph.facebook.com/v24.0//phone_numbers?access_token=
```
Example (replace IDs and token with yours):
`https://graph.facebook.com/v24.0/109929475293471/phone_numbers?access_token=...`
Use the **Graph API version** your app is pinned to if it differs from `v24.0`.
The JSON response includes a `data` array. For each number, copy **`id`** into
Masivo as **Phone Number ID** and use **`display_phone_number`** or
**`verified_name`** to pick the right line when labeling. Optional fields such
as `quality_rating` help you tell numbers apart.
### Configure the webhook in Meta
Meta delivers WhatsApp events to the **callback URL** you register and checks
your **Verify Token** during setup. Use the **same** callback URL and verify
token as in Masivo (**Verify Token** in this form and the read-only webhook
URL). See Meta’s
[Set up webhooks](https://developers.facebook.com/docs/whatsapp/cloud-api/guides/set-up-webhooks/)
guide for field subscriptions and behavior.
In **[Meta App Dashboard](https://developers.facebook.com/apps)**, open your app
(the one with WhatsApp). If the app was created with the **Connect with
customers through WhatsApp** use case, go to:
1. **Use cases**
2. **Connect with customers through WhatsApp**
3. **Customize**
4. **Configuration**
There, set the **Callback URL** to Masivo’s webhook URL, enter the **Verify
token** to match Masivo exactly, and subscribe to the **webhook fields** you
need (for example **messages** and template or account fields for delivery and
status updates).
If your dashboard uses the classic layout instead, Meta documents the same panel
as **WhatsApp** → **Configuration** in the App Dashboard.
## Step 3: Configure business logo
In **Business Logo**, upload the WhatsApp profile image used in chat previews.
This file is stored in marketing automation settings storage for your account.
## Step 4: Save and understand masking behavior
Click **Save** in form actions.
After saving:
* Sensitive credentials are masked in the UI.
* Masked fields become disabled/read-only.
* Save actions are blocked while masked values are present.
Configure and verify all required fields before saving to avoid incomplete
credential state.
Editing is restricted for non-admin roles in this settings form.
 ## What you've accomplished
You've configured WhatsApp channel credentials, webhook connectivity, and
branding needed for template operations in Masivo.
## Next steps
* Create and manage templates in [WhatsApp templates guide](/guides/create-whatsapp)
* Use approved templates in [Journeys](/guides/create-journeys)
## What you've accomplished
You've configured WhatsApp channel credentials, webhook connectivity, and
branding needed for template operations in Masivo.
## Next steps
* Create and manage templates in [WhatsApp templates guide](/guides/create-whatsapp)
* Use approved templates in [Journeys](/guides/create-journeys)